DIY Artificial Grass Installation: A Complete Guide
Ready to elevate your outdoor living area with a lush, maintenance-free lawn? DIY artificial grass installation is a rewarding project that can save you thousands while providing a professional-quality result that lasts for decades. This comprehensive guide will walk you through every step of transforming your space—from proper ground preparation to finishing touches that ensure your synthetic turf looks flawless year-round. With the right tools, techniques, and insider knowledge, you’ll create a beautiful, durable surface that withstands heavy use, remains vibrant in all weather conditions, and dramatically reduces your outdoor maintenance time. Let’s dive into what makes a successful installation and how you can master this transformative home improvement project.
Essential Tools and Materials: Setting Yourself Up for Success
Transforming your outdoor space with artificial grass is one of the most rewarding DIY projects you can undertake—but your success hinges largely on having the right tools and materials at your disposal. With proper equipment, you’ll achieve professional-looking results that withstand the test of time, saving you from costly repairs or replacements down the road [Source: Artificial Turf Supply].
According to industry experts, having the right tools accounts for approximately 40% of your installation success, with proper ground preparation and quality materials making up the rest [Source: Teka Flooring]. Let’s explore the essential tools and materials you’ll need for your artificial grass project.
PRO TIP: Quality tools may cost more upfront but will deliver superior results and save you time throughout your installation. Remember—your artificial lawn is designed to last 20+ years, so proper installation is worth the investment.
Essential Tools
Cutting Tools: Precision Makes Perfect
- Utility Knife with Extra Blades – This is your primary cutting tool for trimming your artificial grass to size and creating precise edges. Look for a knife with a comfortable grip and replaceable blades, as turf can dull blades quickly. Cost: $10-30 to purchase. A quality option is the Stanley FatMax Retractable Utility Knife ($15) [Source: Lawn Love].
- Carpet Kicker – Used to stretch and position your artificial turf properly, eliminating wrinkles and ensuring tight seams. While not essential for smaller projects, it’s invaluable for larger installations. Cost: $30-75 to purchase, $20-35/day to rent. Recommendation: Rent for one-time projects [Source: ReTurf].
Ground Preparation Tools: Creating a Solid Foundation
- Plate Compactor – Essential for compacting the base material to create a solid foundation. This powerful tool ensures your base is firm and level, preventing future settling issues. Cost: $300-1,500 to purchase, $60-100/day to rent. Recommendation: Definitely rent for one-time installations [Source: The Turf Yard].
- Landscape Rake – Used for leveling base materials evenly across your installation area. A sturdy aluminum rake with a 36″ head works best. Cost: $30-60 to purchase. Recommendation: Buy, as it’s reasonably priced and useful for other yard projects [Source: Teka Flooring].
- Shovel – Required for removing existing soil and vegetation, as well as distributing base materials. A square-edged shovel is ideal for clean cuts through existing grass. Cost: $20-50 to purchase. Recommendation: Buy, as it’s a staple tool for any homeowner [Source: Lawn Love].
Installation and Finishing Tools: The Details That Make a Difference
- Hammer – Needed for driving turf nails or landscape pins to secure your artificial grass in place. A standard claw hammer works fine. Cost: $10-30 to purchase. Recommendation: Buy, as most households already own one [Source: Ergeon].
- Seam Roller – This tool helps press down seaming tape and adhesive when joining sections of turf together, ensuring strong, invisible seams. Cost: $40-80 to purchase, $15-25/day to rent. Recommendation: Rent unless you’re planning multiple installations [Source: Artificial Turf Express].
- Power Broom – Essential for brushing turf fibers upright after installation and distributing infill material evenly. Cost: $150-300 to purchase, $40-75/day to rent. Recommendation: Rent for one-time projects [Source: EcoGrass US].
- Lawn Roller – Used to flatten the turf after installation, ensuring good contact with the base material. Cost: $70-150 to purchase, $25-40/day to rent. Recommendation: Rent for single-use projects [Source: Purchase Green].
- Measuring Tape – Critical for accurately measuring your installation area and cutting turf to the correct size. A 25′ or longer tape is recommended. Cost: $10-25 to purchase. Recommendation: Buy, as it’s inexpensive and useful for many household projects [Source: Teka Flooring].
- Circular Saw with Turf Blade (Optional) – Helpful for cutting through multiple layers of turf or creating perfectly straight edges on larger installations. Cost: $100-200 for the saw plus $25-50 for a specialized turf blade. Recommendation: Only purchase if you have other uses for the saw; otherwise, the utility knife will suffice for most installations.
| Tool Type | Buy or Rent? | Why |
|---|---|---|
| Cutting Tools | Buy | Affordable and useful for multiple projects |
| Plate Compactor | Rent | Expensive and only needed temporarily |
| Power Broom | Rent | Specialized tool with limited ongoing use |
| Ground Prep Tools | Buy | Reasonably priced with multiple uses around your property |
Essential Materials
Base Materials: The Foundation of Long-lasting Results
- Crushed Stone/Decomposed Granite – Creates a stable, permeable base layer that supports your artificial grass while allowing for drainage. You’ll need about 2-4 inches depth across your installation area. Cost: $30-60 per ton, with approximately 1 ton covering 100 square feet at 2-inch depth [Source: EcoGrass US].
- Weed Barrier Fabric – Prevents weeds from growing up through your artificial grass while allowing water to drain. Look for a commercial-grade, UV-resistant fabric. Cost: $30-70 for 300 square feet [Source: Teka Flooring].
Artificial Grass and Accessories: Quality Matters
- Artificial Grass – Select a quality product with appropriate pile height, density, and color for your specific needs. Pet-friendly options include antimicrobial treatments, while high-traffic areas benefit from denser construction. Cost: $2-8 per square foot depending on quality [Source: Lawn Love].
- Securing Materials – Options include:
- Landscape pins/turf nails (6-8 inches): $15-30 per 100 count
- Seaming tape: $20-40 per 50-foot roll
- Outdoor turf adhesive: $30-70 per gallon (covers approximately 60-100 linear feet of seam)
- Infill Material – Helps support grass blades, regulate temperature, and provide cushioning. Options include:
- Silica sand: $8-15 per 50-pound bag (you’ll need approximately 1-2 pounds per square foot)
- Rubber granules: $20-35 per 50-pound bag (premium option for added cushioning)
- Optifill +: $40 per 50-pound bag (excellent for pet areas to control odors)
- Edging Options – Creates a clean border and prevents grass from shifting:
- Plastic/metal edging: $15-30 per 20-foot section
- Pressure-treated lumber: $2-5 per linear foot
- Concrete curbing: $10-20 per linear foot (professional installation recommended)
DID YOU KNOW? Premium artificial grass can last 20+ years when properly installed, making it an excellent long-term investment for your property. The upfront costs of quality materials pay dividends through decades of low maintenance and consistent appearance.
Cost-Saving Strategies Without Compromising Quality
Installing artificial grass represents a significant investment in your home, but there are several smart ways to reduce costs without sacrificing the quality of your installation:
- Rent expensive equipment rather than purchasing outright. Items like plate compactors and power brooms are only needed temporarily and can cost hundreds to purchase [Source: Purchase Green].
- Consider turf remnants for smaller projects. Many suppliers offer discounted leftover pieces from larger installations.
- Opt for manual alternatives to powered equipment when feasible. For instance, a hand tamper ($25-50) can replace a plate compactor for very small areas, though it requires significantly more physical effort [Source: Purchase Green].
- Schedule your installation during the off-season (typically fall or winter) when suppliers may offer discounts on materials.
Selecting the Right Turf for Your Needs
When selecting your artificial turf type, consider how the area will be used. For high-traffic zones, opt for denser products with shorter pile heights (1″-1.5″) for better durability. Pet areas benefit from specialized products with enhanced drainage and antimicrobial treatments. Decorative spaces with minimal foot traffic can utilize longer pile heights (1.75″-2.25″) for a more lush appearance [Source: Artificial Turf Supply].
| Area Type | Recommended Pile Height | Special Features |
|---|---|---|
| High-Traffic Areas | 1″ – 1.5″ | Dense construction, durable backing |
| Pet Areas | 1″ – 1.75″ | Antimicrobial treatment, enhanced drainage |
| Decorative/Low-Traffic | 1.75″ – 2.25″ | Softer feel, more natural appearance |
| Play Areas | 1.5″ – 2″ | Extra cushioning, fall protection |
The Importance of Preparation
Having all materials and tools on-site before beginning installation is crucial for several reasons:
- It prevents costly delays and keeps your project on schedule
- It allows you to inspect materials for defects before cutting or installation
- It ensures you won’t have partially completed sections exposed to weather or damage
- It helps you verify that quantities are sufficient for your entire project
Proper material storage is also essential. Store your artificial grass rolls in a dry, cool location, and allow them to acclimate to outdoor temperatures for at least 24 hours before installation. Adhesives should be kept at recommended temperatures (typically 50-90°F) to maintain proper viscosity for application [Source: The Turf Yard].
Environmental Responsibility
After completion, responsibly dispose of waste materials. Many components of artificial grass installation are recyclable, including cardboard packaging and certain base materials. Check with your local waste management facility for proper disposal protocols for adhesive containers and turf scraps.
With the right tools and materials at your disposal, you’re now ready to move on to the critical ground preparation phase, which will form the foundation of your successful artificial grass installation.
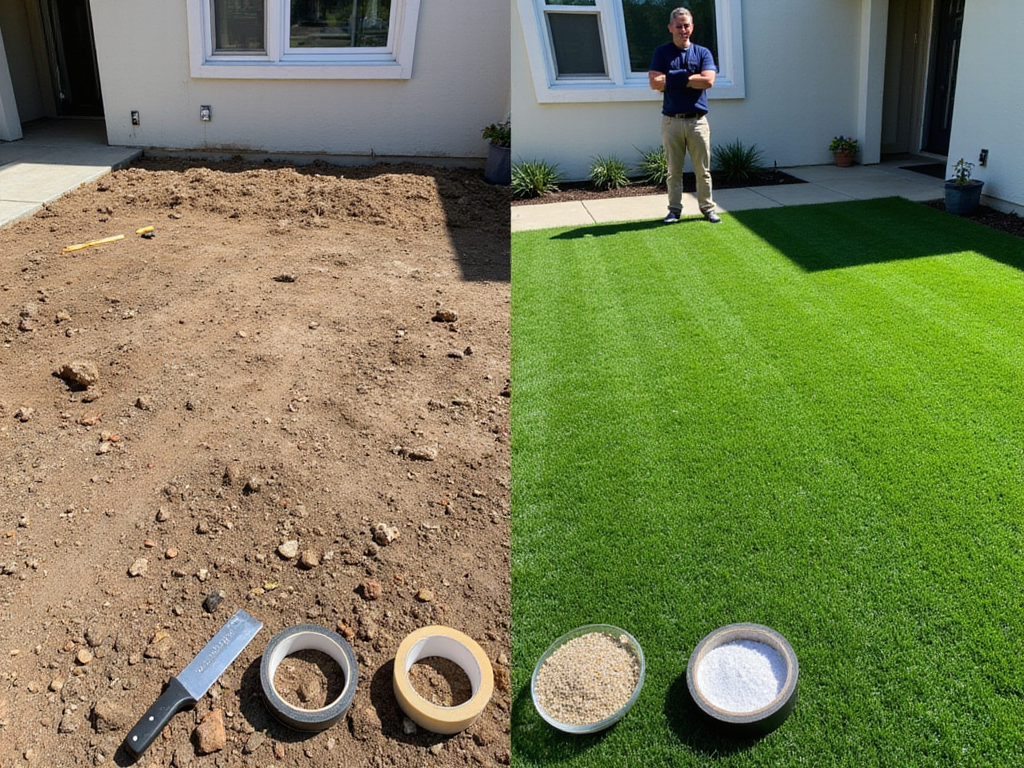
Ground Preparation: Creating the Perfect Foundation
Ground preparation is the cornerstone of a successful artificial grass installation, accounting for approximately 80% of your project’s overall success. This critical phase determines not only the immediate appearance of your turf but also its long-term performance, drainage capabilities, and durability. With proper attention to detail, you’ll create a stable, level surface that will support your artificial grass for decades.
Did you know? Proper ground preparation is the most crucial factor in your artificial grass installation’s longevity and appearance—it’s worth investing the time to get it right!
Site Assessment: Understanding Your Space
Before you dig in, get to know your yard. The first step in any artificial grass installation is a thorough site assessment. Begin by carefully examining your installation area to identify potential challenges [Source: Artificial Turf Supply].
What to Look For During Your Assessment:
- Drainage issues: Look for signs of poor drainage such as areas where water pools after rain
- Soil composition: Pay close attention to the soil type in your yard, as different compositions require different approaches
- Underground systems: Mark any irrigation lines, utility connections, or other systems that must be preserved
Clay-heavy soils typically need deeper excavation than sandy soils, while rocky terrain may present unique challenges [Source: Elite Turf Supply].
Pro Tip: Using spray paint or flags, clearly outline the installation area, including any curves or special features you plan to incorporate. This visual guide will help keep your project on track.
Vegetation Removal: Creating a Clean Slate
Complete removal of existing vegetation is non-negotiable for a successful installation. For small areas, manual removal with shovels and rakes may suffice, but larger projects benefit from mechanized help:
- For established lawns, use a sod cutter set to a depth of 1-2 inches to efficiently remove the grass layer [Source: The Turf Yard].
- For weedy areas or patchy lawns, apply a non-toxic herbicide 2-3 weeks before installation, then remove dead vegetation once it has dried out.
- For areas with persistent weeds, consider multiple treatments before proceeding with installation.
Removing Larger Plants and Roots
When removing larger plants or tree roots, excavate thoroughly to prevent future growth. Dig at least 6 inches beyond the visible root system to ensure complete removal [Source: Chicago Landscape LV].
Environmentally Friendly Disposal:
- Consider composting suitable organic matter
- Check with local waste management about green waste collection options
- Some vegetation can be repurposed in other areas of your garden
Grading and Drainage: Engineering for Longevity
Proper drainage is perhaps the most critical aspect of ground preparation. Without it, water can pool beneath your turf, leading to bacteria growth, unpleasant odors, and premature degradation.
Creating the Perfect Slope
Create a slight slope (typically 1-2%) away from buildings and structures by carefully grading the soil [Source: Tomahawk Power].
Helpful Reference: A 1% grade means the surface drops 1 inch for every 100 inches of horizontal distance—subtle but effective for proper water runoff.
Solutions for Problem Areas
For areas with known drainage issues:
- Install perforated drain pipes in a herringbone pattern beneath the base layer
- Create a drainage layer using larger aggregate (¾” crushed stone)
- Consider using drainage mats in particularly problematic areas
Quality Check: Use a long straight board and level to check your grading progress. Water should always flow away from structures and toward appropriate drainage points [Source: Easigrass].
Base Material Selection and Installation
The base layer provides stability and drainage for your artificial grass, making your material selection crucial:
| Base Material | Benefits | Recommended Depth |
|---|---|---|
| Limestone Screening | Excellent drainage, natural stability | 3-4 inches |
| Crushed Stone (3/8″ minus) | Superior compaction, good drainage | 3-4 inches |
| Class II Road Base | Balance of stability and drainage | 3-5 inches |
For most residential applications, a 3-4 inch depth of compacted base material is sufficient. However, high-traffic areas and regions with poor natural drainage may benefit from deeper installation [Source: Select Surfaces].
Proper Base Installation Steps:
- Spread evenly: Distribute your chosen material uniformly across the entire area using rakes
- Consider equipment: For larger areas, specialized equipment like a mini skid steer can move materials efficiently
- Compact thoroughly: Use a plate compactor to establish a firm foundation
Compaction Techniques for Long-Term Stability
Proper compaction is essential for long-term stability. For optimal results:
- Add a thin layer of water before compaction to help materials bind together
- Compact in multiple passes, working from the edges inward
- Check regularly with a long, straight board to ensure proper level and slope
- Continue adding material and compacting until you reach the desired height and compaction
The Perfect Base Test: Your base should be firm enough that walking on it leaves minimal footprints [Source: FieldTurf Landscape].
Weed Prevention: Protecting Your Investment
Weeds can be persistent even under artificial turf, making prevention essential:
- Apply a pre-emergent herbicide to the compacted base
- Install a commercial-grade, non-woven geotextile weed barrier fabric over the entire area
- Overlap seams by 3-6 inches to prevent weed migration between sections
- Secure the fabric with landscape staples or pins every 12-18 inches along edges and seams
For Persistent Weed Areas: If you’re dealing with aggressive weed species or known root problems, consider using a heavier grade weed fabric or doubling up layers in problem areas [Source: Artificial Turf Express].
Troubleshooting Common Ground Preparation Issues
Clay Soil Challenges
If your yard has heavy clay soil, improve drainage by:
- Increasing base depth to 5-6 inches
- Adding a layer of coarse sand on top of your base material
- Installing additional drainage solutions like French drains around the perimeter
Tree Root Management
When installing near trees:
- Create root barriers by digging trenches and installing heavy plastic sheeting vertically
- Consider root pruning by a certified arborist for valuable trees
- Use deeper base installation to accommodate future root growth
Level Transitions with Existing Surfaces
For seamless transitions to concrete or other hard surfaces:
- Keep artificial grass approximately ¼-½ inch higher than the adjacent surface
- Create a gradual slope using base materials for smooth transitions
- Consider using special transition strips or edging systems
Working with Irrigation Systems
If preserving sprinklers for surrounding natural areas:
- Cap off unnecessary heads within the turf area
- Adjust remaining heads to prevent overspray onto artificial grass
- Consider converting to drip irrigation for adjacent plant beds
Pre-Installation Quality Check
Don’t skip this crucial step! Before proceeding to turf installation, perform these critical quality checks:
- Compaction Test: Walk across the entire surface—your footprints should be minimal
- Level Check: Use a long, straight board with a level to verify proper grading
- Drainage Test: Spray water with a hose to ensure proper runoff without pooling
- Edge Inspection: Verify all borders are secured and properly defined
- Cleanliness Check: Remove any debris, ensuring a perfectly clean base
Fix any issues before proceeding, as they’ll be much harder to address once the turf is installed [Source: Ruff n Tuff Turf].
Remember: While proper ground preparation requires significant time and effort, it’s the foundation of a successful installation. Taking shortcuts during this phase will inevitably lead to problems down the road, potentially requiring costly repairs or even complete reinstallation.
By following these comprehensive ground preparation steps, you’ll create the perfect foundation for a beautiful, long-lasting artificial grass installation that will provide years of enjoyment with minimal maintenance.
Measuring, Cutting and Seaming: Professional Techniques for Flawless Results
Creating a seamless artificial grass installation requires meticulous attention to detail during the measuring, cutting, and seaming processes. These crucial steps determine both the aesthetic appeal and long-term durability of your synthetic turf project. By following professional techniques and utilizing the right tools, you can achieve flawless results that will last for years to come.
The Importance of Accurate Measuring and Planning
Proper planning is the foundation of any successful artificial grass installation. Before cutting a single piece of turf, professional installers spend considerable time planning and measuring. Creating a detailed layout diagram helps visualize the entire installation while minimizing waste and planning optimal seam placement [Source: The Turf Yard].
For precise measurements, professionals now rely on digital laser measuring tools like the Bosch GLM 50 C or Leica DISTO D2, which offer accuracy within 1/16 of an inch. These devices connect to smartphones via Bluetooth, allowing measurements to be incorporated directly into digital planning applications [Source: Select Surfaces].
Essential Layout Planning Principles
When creating your layout, remember these key principles:
- Account for pile direction (the way grass blades lean) by ensuring all turf sections face the same direction
- Add a 2-3 inch extra allowance around perimeters for trimming
- Plan seam placement strategically to minimize visibility and maximize strength
- Position seams perpendicular to the primary viewing angle whenever possible
- Avoid placing seams in high-traffic areas that could experience premature wear
“Planning your seam locations is critical. Ideally, seams should be positioned away from main viewing angles and high-traffic zones to minimize their visibility and reduce wear over time” – industry expert Tom Morgan [Source: Ruff N Tuff Turf].
Unrolling and Acclimating the Turf
Did you know? Proper acclimation prevents future shifting and ensures a perfectly flat installation. Artificial grass needs to acclimate before cutting and installation to prevent shrinking or expanding after placement. Professionals recommend acclimating turf for at least 1-2 hours at the installation site, allowing the material to adjust to ambient temperature [Source: Artificial Turf Supply].
Step-by-Step Unrolling Process
When unrolling the turf:
- Position rolls according to your layout plan, ensuring consistent pile direction
- Unroll turf carefully to avoid damaging the backing
- Place heavy objects (sandbags or bricks) along edges to reduce wrinkles
- Allow turf to “relax” and acclimate in sunlight, as heat helps flatten wrinkles
Professional installers often use the “back roll” technique, where they slightly roll the turf in the opposite direction of the factory roll to help it lay flatter faster. “This counteracts the memory of how the material was stored and accelerates the acclimation process,” notes installation expert Michael Rodriguez [Source: Waterless Turf].
Precision Cutting Techniques
Cutting artificial grass with precision requires both the right tools and proper technique. The quality of your cuts directly impacts the seamlessness of your final installation. Professional-grade tools make a significant difference in achieving clean, accurate cuts.
Selecting the Right Cutting Tools
| Tool Type | Recommended Models | Best Uses |
|---|---|---|
| Heavy-duty utility knives | Stanley FatMax, Milwaukee FASTBACK | General cutting, detailed work |
| Carpet/turf cutters | Roberts 10-616, Sigma 8B3 | Long, straight cuts across large sections |
| Specialized scissors | Various models | Detail work around obstacles and curves |
| S-shaped carpet knives | Various models | Precise trimming along edges |
“Always keep multiple sharp blades on hand. Dull blades create jagged edges that are difficult to seam properly and can lead to visible connections between turf sections” – professional installer Chris Thomas [Source: FieldTurf Landscape].
Essential Cutting Techniques
When cutting artificial grass, follow these professional techniques:
- Cut from the back side whenever possible for cleaner edges
- Use a straight edge or board as a cutting guide for long, straight cuts
- Make multiple passes with light pressure rather than trying to cut through in one stroke
- Change blades frequently to maintain cutting precision
- Cut around obstacles by creating paper templates first, then transferring to turf
Pro Tip: For complex shapes or obstructions like trees or posts, professionals recommend creating templates using craft paper or cardboard before cutting the turf itself. This allows for visualization and adjustments before making any permanent cuts [Source: Artificial Turf Supply].
Professional Seaming Methods
Creating invisible seams is perhaps the most critical skill in artificial grass installation. Your seams can make or break the overall appearance of your turf project. Proper seaming ensures a unified appearance and prevents edges from lifting or separating over time.
Adhesive Selection Guide
Professionals typically choose between:
- One-component adhesives: Like Turf Bond or SikaBond, these are easier to use for DIYers and smaller projects. They cure through reaction with atmospheric moisture.
- Two-component adhesives: Products like Nordot 34G or SikaForce-7710 provide the strongest bonds and faster curing times, making them preferable for large commercial installations [Source: Select Surfaces].
Weather Considerations: Weather conditions significantly impact adhesive performance. In cold weather (below 50°F/10°C), professionals often use accelerators to speed up curing time, while in extreme heat, they may add retarders to prevent premature setting [Source: FieldTurf Landscape].
Seaming Tape Options
Quality seaming tape provides additional structural support for joins. Popular professional products include:
- TurfGrip Pro seaming tape (6″ width preferred for maximum strength)
- Emerald Seam Tape (featuring enhanced water resistance)
- PolyBond tape (with specialized non-porous backing that prevents adhesive bleed-through)
The latest innovation in 2025 is biodegradable seaming tape that provides full strength for 15+ years but gradually breaks down afterward, making eventual turf replacement more environmentally friendly.
No-Glue Seaming Alternatives
The industry is increasingly adopting no-glue seaming alternatives that reduce chemical use and simplify installation:
- Sod staples and seam nails: Galvanized U-shaped pins secure edges every 3-4 inches along seams
- Seam-fixing tape: Products like EasySeam or TurfTack use specialized pressure-sensitive adhesives that activate when compressed
- Heat-bonding systems: Professional-grade heat welding tools melt the backing material to create strong polymer bonds between sections [Source: Chicago Landscape LV]
Creating Truly Invisible Seams: A 5-Step Process
Achieving truly invisible seams requires attention to several factors:
- Precise cutting: Ensure edges are cut straight and clean, without fraying
- Proper alignment: Butt edges together without overlapping or leaving gaps
- Blade direction matching: Ensure pile direction is identical across all sections
- Blade manipulation: Professionals use special brushes to carefully lift and blend fibers along seam lines
- Infill application: Apply infill material carefully over seams to help disguise jointing
“The key to invisible seams is what we call ‘cutting and tucking.’ You need to cut the backing very precisely, but leave the top fibers slightly longer. This allows you to tuck those extra fibers into the adjacent piece, creating a seamless transition when brushed properly” – veteran installer David Martinez [Source: Tomahawk Power].
Handling Transitions and Obstacles
Transform your yard into a cohesive outdoor living space by mastering these transition techniques. Creating clean transitions between artificial grass and other materials (concrete, wood, natural grass) requires specialized techniques:
- For concrete edges, professionals create a small channel (¼ inch deep) to tuck and secure the turf edge
- Transitions to wood decking often use hidden fastening systems like TrimFix clips
- For natural grass transitions, metal or plastic edging creates a clean dividing line
- When working around irrigation systems or lighting, create templates and cut precision holes, then seal edges with adhesive [Source: Artificial Turf Express]
Troubleshooting Common Issues
Even experienced installers occasionally encounter challenges. Here’s how professionals address common problems:
| Problem | Solution |
|---|---|
| Misaligned seams | If detected before adhesive sets, carefully separate and realign; once set, consider adding additional seam tape underneath |
| Bubbling or wrinkling | Usually caused by temperature changes or improper acclimation; fix by carefully lifting turf and reapplying adhesive |
| Visible seams due to pile direction | Use a stiff brush to manipulate fibers, or apply additional infill to obscure the transition |
| Damaged sections | For small tears, use specialized repair tape; for larger damage, cut out the damaged section and replace using seaming techniques |
Quality Inspection Before Securing
Your final quality check is your insurance policy against future problems. Before proceeding to the securing phase, professional installers conduct a thorough quality check:
- Examine all seams visually and by touch to ensure they’re flush and undetectable
- Check for proper blade direction consistency across the entire installation
- Verify all cuts around obstacles are precise and well-secured
- Inspect edges for clean, consistent trimming
- Ensure the entire surface lays flat without wrinkles or bubbles
Taking time during this quality inspection step prevents problems from becoming permanent once the artificial grass is secured to the base in the next installation phase.
Securing and Finishing: From Installation to Long-Term Beauty
Ready to transform your outdoor space into a maintenance-free oasis? The final stages of artificial grass installation are crucial for ensuring your investment stands the test of time. At this vital phase, attention to detail makes all the difference between an average installation and a premium, long-lasting result that enhances your property value for decades.
Your artificial lawn isn’t just an upgrade—it’s a lifestyle transformation that saves time, conserves water, and creates a beautiful outdoor space your family will enjoy year-round.
Let’s explore the professional techniques that ensure your artificial grass installation maintains its pristine appearance through all seasons while requiring minimal upkeep.
Perimeter Securing Methods: Creating Strong Boundaries
The edges of your artificial lawn serve as the foundation for the entire installation’s stability. Proper securing prevents shifting, lifting, and unsightly ripples that can compromise both aesthetics and functionality. Here’s how to create strong boundaries based on your specific border materials:
For Concrete Borders:
- Adhesive method: Apply polyurethane-based adhesives in a continuous bead along turf edges for the strongest bond [Source: Artificial Turf Supply]
- Nail/spike alternative: Use concrete nails with plastic washers every 4-6 inches along edges for additional security
For Wooden Edges:
- Stapling technique: Apply galvanized staples every 3-4 inches using pneumatic staplers
- Screws with washers: For maximum hold on wooden borders, especially in high-wind areas [Source: Turf Pro Synthetics]
For Metal/Plastic Edging:
- U-pins/landscape nails: Use 6-inch galvanized or stainless-steel pins spaced 4-5 inches apart
- Adhesive backing: Apply weather-resistant adhesive tape along specialized edging systems
Climate Considerations for Ontario and Beyond:
| Climate Type | Recommended Adjustment |
|---|---|
| Hot regions (90°F+) | Decrease spacing to 3-4″ between securing points to prevent heat expansion issues |
| Freeze/thaw cycles | Use flexible adhesives with elastic properties to accommodate expansion |
| High humidity | Choose marine-grade fasteners to prevent corrosion |
Interior Securing Techniques: Preventing Movement
For larger installations—especially those creating multi-purpose recreational spaces—additional interior support is essential to prevent bubbling and movement over time. Implement these professional techniques to ensure stability throughout the entire surface:
- Grid-pattern securing: Place landscape nails or U-pins in a grid pattern (every 2-3 feet) throughout large installations, especially in high-traffic areas
- Low-profile systems: Modern turf anchors with minimal visibility provide interior support without compromising aesthetics [Source: Interlock Toronto]
- Seam securing: Place additional pins along seams at 6-8 inch intervals, alternating sides for maximum hold
Infill Application: The Foundation of Stability
Proper infill isn’t just an option—it’s an essential component that provides stability, supports grass blades, and regulates temperature. The right application technique enhances both performance and longevity:
Infill Material Comparison:
| Infill Type | Pros | Cons | Best For |
|---|---|---|---|
| Silica Sand | Cost-effective, excellent stabilization | Limited cooling properties | General residential use |
| Crumb Rubber | Superior cushioning, good drainage | Potential heat retention, environmental concerns | Play areas, athletic fields |
| Acrylic Coated Sand | Antimicrobial properties, reduced dust | Higher cost | Pet areas, premium installations |
| Organic Options (Cork, Walnut Shells) | Eco-friendly, cooling properties | May decompose over time, higher cost | Environmentally conscious projects |
Application Rates by Pile Height:
- Short pile (3/4″ – 1″): 1-1.5 lbs per square foot
- Medium pile (1″ – 1.5″): 1.5-2 lbs per square foot
- Long pile (1.5″ – 2″): 2-3 lbs per square foot [Source: Omnissal]
4-Step Application Process for Professional Results:
- Use proper equipment: Apply infill using a drop spreader for even distribution
- Work methodically: Focus on smaller sections (10×10 feet) for better control
- Layer strategically: Apply in multiple thin layers rather than one heavy application
- Brush thoroughly: Work between applications to ensure even distribution and optimal blade support
Professional Brushing Techniques for Natural Appearance
Proper brushing is what separates amateur installations from professional-looking results. This crucial step ensures your artificial grass achieves a natural appearance and optimal performance:
- Brushing direction: Brush against the grain initially to lift fibers that may have been compressed during installation
- Cross-brushing pattern: Brush in multiple directions using a criss-cross pattern to ensure uniform fiber orientation
- Power brushing: For larger installations, use a power broom with nylon bristles (avoid metal that could damage fibers)
- Bristle selection: Medium-stiff synthetic bristles work best; natural bristles may deteriorate too quickly [Source: Synthetic Grass Warehouse]
Finishing Touches That Elevate Your Installation
These final details transform a good installation into a showcase-worthy outdoor space:
- Edge treatments: Use decorative rock, pavers, or edging materials to create clean transitions between turf and other surfaces
- Final trimming: Clip any stray fibers with scissors after brushing is complete
- Seam inspection: Check all seams under direct sunlight to ensure they’re invisible
Initial Maintenance Protocol: The First 48 Hours
What you do immediately after installation significantly impacts long-term performance. Follow this critical protocol:
- Allow settling: Let the infill settle for 24-48 hours before heavy use
- Initial irrigation: Lightly spray the turf with water to help settle the infill evenly
- First inspection: Check for any areas needing additional infill or securing
- Initial cleaning: Remove any installation debris with a leaf blower or soft brush [Source: The Turf Yard]
Long-Term Maintenance: Preserving Your Investment
One of the greatest benefits of artificial grass is its minimal maintenance requirements—but “low maintenance” doesn’t mean “no maintenance.” Follow this simple schedule to ensure decades of enjoyment:
Monthly Tasks (15 Minutes):
- Brush the surface to prevent matting, especially in high-traffic areas
- Remove debris with a leaf blower or plastic rake (avoid metal rakes)
- Inspect for any areas needing repair or additional securing
Quarterly Tasks (30 Minutes):
- Deep-clean with a mild detergent solution (1:20 ratio with water)
- Check infill levels and replenish as needed
- Inspect perimeter securing for any loosening
Annual Tasks (2-3 Hours):
- Professional power brushing to rejuvenate fibers
- Complete infill assessment and replenishment
- Weed prevention treatment along edges
- Full inspection of all seams and secured areas [Source: Artificial Grass Landscape]
Troubleshooting Common Post-Installation Issues
Even with perfect installation techniques, occasional issues may arise. Here’s how to address them quickly:
Drainage Problems:
- Symptom: Standing water after rain
- Solution: Check base material for proper drainage, add perforations in backing if needed, install additional drainage points
Insufficient Infill:
- Symptom: Matted or flattened areas, visible backing
- Solution: Add recommended amount of infill, brush thoroughly to distribute evenly
Repairing Damaged Sections:
- Small tears: Use seam tape and adhesive to repair from beneath
- Larger damage: Cut out damaged section and replace with matching turf using seaming techniques
Weed Prevention:
- Apply pre-emergent herbicide along edges seasonally
- Ensure weed barrier extends beyond turf edges
- Remove organic debris promptly to prevent decomposition that can support weed growth [Source: Artificial Turf Express]
The secret to a beautiful, long-lasting artificial grass installation lies in these professional securing and finishing techniques. By implementing these methods and following the recommended maintenance schedule, your synthetic lawn will maintain its pristine appearance for decades, providing your family with a low-maintenance outdoor space that enhances your property value and lifestyle throughout every season.
Advanced Techniques and Special Applications: Taking Your Installation to the Next Level
Installing Artificial Grass on Challenging Surfaces
Transform challenging spaces into beautiful, low-maintenance green areas that last for decades with these specialized installation techniques.
Turning concrete patios, sloped yards, or roof decks into lush green spaces isn’t just possible—it’s an opportunity to showcase true craftsmanship. Each surface presents unique challenges that, when properly addressed, can yield professional results that will enhance your outdoor living experience for years to come.
Concrete and Hardscape Installation
Installing artificial grass on concrete requires careful attention to drainage and adhesion. Begin by thoroughly cleaning the concrete surface and repairing any cracks or uneven areas [Source: Angi]. For proper drainage, install a 3/8-inch shock pad underlay with perforations that allow water to flow through.
When securing your new turf, use a high-quality outdoor-rated polyurethane adhesive applied in a zigzag pattern approximately 12 inches apart along the perimeter and seams [Source: Bella Turf]. Unlike soil installations, concrete requires a full perimeter bond to prevent lifting at the edges.
For enhanced comfort and safety, consider these specialty cushioned underlayment options:
- Basic foam padding (8mm) for residential patios
- Premium shock-absorbing pads (16mm) for play areas
- Thermal barrier underlayment for extreme heat reduction (reduces surface temperatures by up to 15°F)
Sloped Areas
Sloped surfaces demand enhanced securing methods to prevent shifting while maintaining proper drainage. For grades exceeding 15°, install horizontal nailer boards every 3-4 feet to create “steps” that prevent downward migration of the turf [Source: Turf Monsters].
Pro Tip: Secure the turf at each level using galvanized nails or stakes spaced every 4-6 inches for maximum stability in all weather conditions.
For effective drainage on slopes:
- Create a herringbone pattern of small channels beneath the turf
- Use crushed stone aggregate for superior water flow
- Ensure a minimum 2% grade sloping away from structures
- Test water flow before final installation
This approach prevents water accumulation that could compromise your installation [Source: The Turf Yard].
Roof Decks and Balconies
Rooftop installations require careful consideration of weight limits and waterproofing integrity. Always begin by consulting a structural engineer to verify load-bearing capacity, including the combined weight of the turf system (approximately 4-7 lbs/sq ft when fully installed).
Waterproofing Essentials: Never penetrate the existing membrane with fasteners. Instead, create a floating installation using:
- Interlocking plastic grid drainage tiles as a base layer (1″ height)
- Lightweight aggregate infill rather than traditional sand (30-40% weight reduction)
- Perimeter weighting with concrete pavers rather than adhesives
For wind uplift prevention, consider a turf product with reinforced backing and apply additional weight at edges and corners where uplift forces are strongest [Source: Synthetic Turf of Puget Sound].
Specialized Applications
Creating Professional-Grade Putting Greens
Imagine stepping into your backyard for a quick round of golf on your custom putting green—no tee time required.
Installing a high-quality putting green requires specialized materials and techniques that differ from standard lawn installations. Begin with a more extensive base preparation: after removing existing material, excavate to a depth of 4-5 inches and create a precisely contoured sub-base with 2-4% slope for proper drainage [Source: DFW Turf].
Select short pile turf (½” to ¾”) specifically designed for putting surfaces, featuring:
- Denser fiber count (usually 8,000-10,000 stitches per square meter)
- Nylon rather than polyethylene fibers for improved ball roll
- Specialized backing with enhanced dimensional stability
For professional cup installation:
- Use specialized cup-cutting tools for precise holes
- Install regulation cups with rigid collar supports
- Position cups at least 3 feet from the green’s edge
- Space multiple cups at least 6 feet apart
This creates a true golf experience right in your own backyard [Source: Go Turf].
Sports Courts and Play Areas
Athletic surfaces require specialized infill and shock absorption systems for safety and performance. For multi-sport courts, select turf with 1-1.25″ pile height and install over a dual-layer shock pad system:
- Bottom layer: 5mm closed-cell foam for consistent ball bounce
- Top layer: 12mm impact-absorbing pad reducing fall injuries by up to 40%
Apply antimicrobial-coated acrylic sand infill at 2-3 lbs per square foot to enhance durability while providing proper foot traction [Source: Motz Group].
For sports court line markings, you have two superior options:
- Select pre-lined turf with factory-applied markings
- Install inlaid lines using contrasting turf colors rather than paint (which requires ongoing maintenance)
Pet-Friendly Installations
Creating a pet-friendly artificial lawn requires addressing drainage, odor control, and durability concerns. Begin with a more substantial drainage layer using ¾” crushed stone rather than decomposed granite, allowing for faster liquid percolation [Source: Artificial Turf Supply].
For optimal pet area performance:
Select antimicrobial turf products with fully perforated backing (minimum 30 holes per square foot) and install with:
- Zeolite infill (1-2 lbs/sq ft) mixed with antimicrobial acrylic-coated sand (2-3 lbs/sq ft) for superior odor control
- A gentle 1-2% slope away from buildings to prevent urine pooling
- A 4″ deep perimeter drainage system using perforated pipe where water can collect
For designated pet relief areas, increase the zeolite concentration by an additional pound per square foot and install a deeper sub-base for enhanced liquid absorption [Source: ReTurf].
Integration with Landscape Elements
Creating Curved Edges and Complex Patterns
Professional installations often incorporate curved edges and patterns that require specialized cutting and securing techniques. For smooth curves, use flexible PVC edging as a template, securing it temporarily with landscape pins before cutting. Make curved cuts with a sharp carpet knife, maintaining consistent cutting pressure to ensure clean edges [Source: Inspire Scapes].
For complex patterns like circles or custom designs:
- Create accurate templates using heavy cardboard or thin plywood
- Position templates on uncut turf and trace with chalk
- Make rough cuts 1″ outside the line, then trim precisely once secured
- Use heat-seaming techniques rather than tape for geometrically challenging joins
Combining with Hardscaping Elements
When integrating artificial grass with pavers, stepping stones or other hardscape elements, precision cutting and proper transitions are essential. For a professional finish, install the hardscape elements first, then:
- Position the turf over the entire area, allowing it to acclimate for 2-3 hours
- Make relief cuts around obstacles, cutting from the bottom side where possible
- Create a ½” gap between turf and hardscape elements for natural expansion
- Install slightly recessed metal or composite edging to create a clean division
Designer Tip: For diagonal or irregular paver patterns, consider using the “puzzle technique” where you cut interlocking shapes into both materials for a seamless integration [Source: Synthetic Turf of Puget Sound].
Water Feature Integration
Installing artificial grass around water features requires careful waterproofing and transition planning. Begin by creating a slight slope (1-2%) away from the water feature to prevent runoff from carrying infill material into the water.
Use concrete curbing or marine-grade composite edging to create a clean boundary between turf and water. Install a waterproof membrane that extends 12-24″ under the turf edge and up the side of the water feature, creating an impermeable barrier against moisture migration [Source: Konzept Garden].
Landscape Lighting Integration
Thoughtfully integrated lighting transforms your artificial lawn from a daytime showpiece into a nighttime masterpiece while enhancing safety.
Embedding lighting within artificial turf enhances both aesthetics and safety but requires planning before installation. For pathway lighting, install conduit below the base layer, allowing wiring to run without creating visible bulges in the finished surface.
Follow these steps for in-turf lighting fixtures:
- Install junction boxes flush with the compacted base layer
- Cut precise holes in the turf backing using a hole saw
- Secure fixtures with waterproof silicone sealant
- Apply additional infill around fixtures to blend edges
Low-profile LED fixtures (under 1″ height) specifically designed for artificial turf integration minimize trip hazards while providing subtle illumination [Source: Lowe’s].
Innovative Solutions for Common Challenges
Heat Reduction Techniques
Combat heat buildup in artificial turf with advanced cooling technologies now available. Install ThermaGreen underlayment designed to reflect radiant heat before it reaches the surface of the turf. This specialized material can reduce surface temperatures by 15-20°F compared to standard installations [Source: Perth Artificial Grass].
Advanced cooling options include:
- Incorporate advanced cooling infills like HydroChill or T°Cool, which activate through moisture evaporation
- These products can reduce surface temperatures by up to 50°F during peak heat conditions
- Effects last for up to 3 days after watering
For maximum cooling performance, combine:
- Light-colored turf fibers (beige or olive tones rather than dark green)
- Reflective backing materials with titanium dioxide additives
- Regularly scheduled light misting during extreme heat events [Source: T°Cool Turf]
Enhanced Drainage Solutions
For areas with heavy rainfall or poor natural drainage, standard perforated backing may be insufficient. Instead, install a comprehensive drainage system beginning with:
- A deep base (4-6″) of graduated aggregate with larger stones (¾”) at bottom transitioning to smaller (⅜”) at top
- An interlocking drainage mat with vertical channels designed to rapidly move water horizontally to perimeter drains
- Connect to existing drainage systems or install French drains around the perimeter
Clay Soil Solution: For clay soils with poor percolation rates, add vertical drainage columns every 6-10 feet by drilling 3″ diameter holes 12-18″ deep and filling with coarse gravel [Source: Wintergreen Grass].
Winter Installation Adaptations
When installing in colder climates, adjust techniques to accommodate temperature constraints. Schedule adhesive applications during warmer daylight hours (above 50°F) and use specialized cold-weather formulations that remain workable down to 35°F. Allow 50% more curing time for seaming tapes and adhesives in low temperatures.
For frozen ground conditions:
- Use propane heaters to thaw work areas in sections
- Install additional drainage measures to accommodate spring thaw
- Allow extra material for contraction in cold weather (approximately ¼” per 10 feet)
Retrofitting Existing Irrigation
Rather than removing existing irrigation systems, many installers now convert them for use with artificial turf. Cap most sprinkler heads but strategically convert some to misters for heat reduction. Relocate valve boxes by extending risers to the new surface level and creating access points with circular turf cuts secured with hook-and-loop fasteners for maintenance access [Source: Synthetic Turf Northwest].
Emerging Trends and Technologies
The artificial grass industry continues to evolve with innovations that enhance both performance and environmental sustainability:
Enhanced Permeability Backing
Revolutionary drainage technology: New backing technologies like “HydroDrain” and “MaxFlow” systems have increased water permeability by up to 1,500 inches per hour, far exceeding the drainage capabilities of natural turf. These systems use multi-layered backings with engineered micropores that prevent infill migration while maximizing water flow [Source: All Outdoors].
Eco-Friendly Components
The latest generation of artificial turf products incorporates recycled and renewable materials:
- Backing made from post-consumer recycled plastics or bio-based polymers
- Fibers incorporating up to 80% recycled content from reclaimed materials
- Rubber infill alternatives made from olive pits, cork, or walnut shells
Environmental Stewardship: Look for products certified under the STC (Synthetic Turf Council) Responsible Return Program, which ensures turf can be recycled at the end of its lifespan [Source: My Chemical-Free House].
Antimicrobial Technologies
Advanced antimicrobial treatments are now being applied to both fibers and infill materials to combat bacteria, mold, and mildew, particularly important for pet areas and public spaces. Look for products treated with zinc pyrithione or silver-based antimicrobials that provide protection throughout the turf’s lifespan [Source: Million Marker].